> ## Documentation Index
> Fetch the complete documentation index at: https://developer.fabric.inc/llms.txt
> Use this file to discover all available pages before exploring further.
# User App Authentication
A user app can authenticate with fabric Identity in one of two ways:
* [Authorization Code Flow with PKCE](https://datatracker.ietf.org/doc/html/rfc7636)
* [Authorization Code Flow](https://openid.net/specs/openid-connect-core-1%5F0.html#CodeFlowAuth)
### Using Authorization Code Flow with PKCE (recommended)
This flow requires the following parameters (for more information, see the [Getting Started](/v3/api-reference/authentication-v3/user-apps/getting-started-with-userapps) guide):
`client-id` - A unique ID that represents the user app, and is required for OpenID Connect authentication flows.
`Authorization Url` - The fabric Identity HTTP endpoint that the user app communicates with to get its access token.
Once these are available, you can build the authentication flow as depicted below:
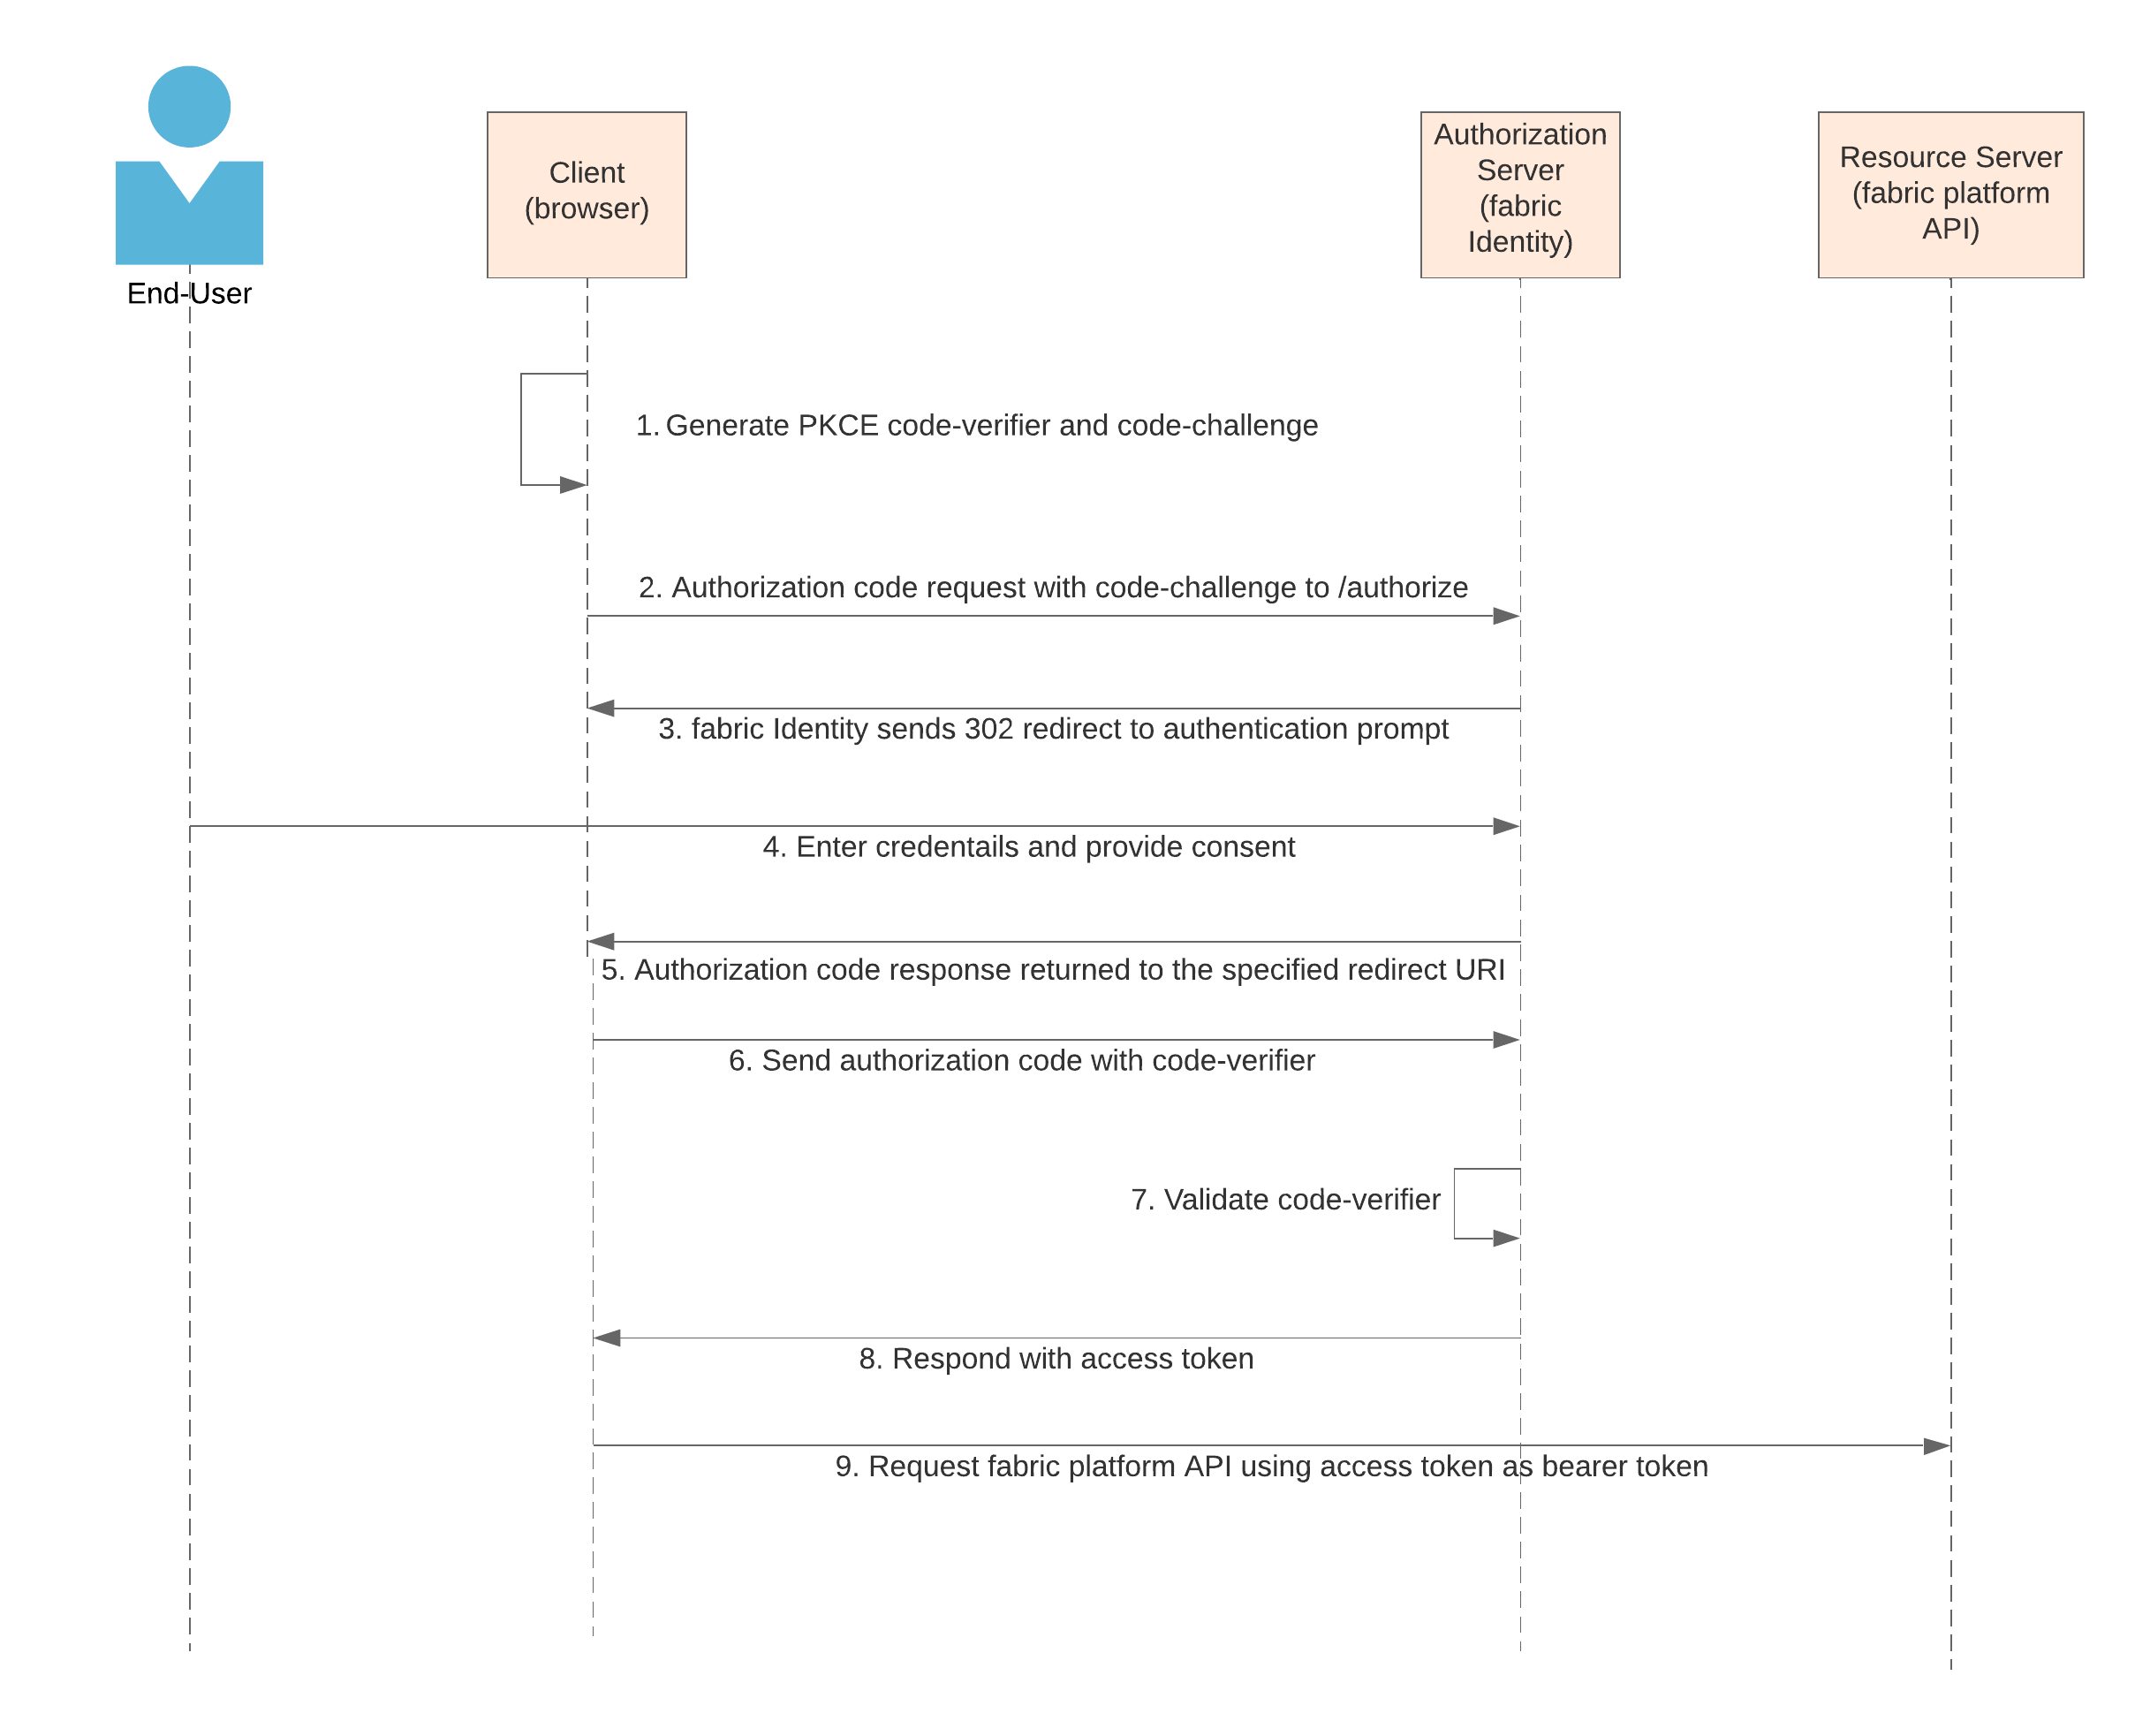 **1. Generate PKCE `code-verifier` and `code-challenge`**
In this step, the single page app or mobile app, represented by the respective user app in fabric Identity, generates a `code-verifier`, which you will use to generate the `code-challenge`. These codes ensure that the access token returned by fabric Identity (step 8) is returned to the correct requestor.
`code-verifier`: Random URL-safe string of at least 43 characters. [Click here](https://datatracker.ietf.org/doc/html/rfc7636#section-4.1) for more details.
`code-challenge`: Base64 URL-encoded SHA-256 hash of the `code-verifier`.
The app should store the `code-verifier` securely to be used later (step 6). The `code-challenge` is sent earlier in the call to the `/authorize` endpoint (step 2).
**2. Authorization code request with `code-challenge` to `/authorize`**
In this step, the app should send a GET request to fabric Identity's `/authorize` endpoint and load the GET URL into the `window.location`. This allows fabric Identity to send a browser redirect, and take the end user to the hosted login page.
This is a representation of the URL that should be constructed and loaded into `window.location`:
```
https://${Authorization Url}/v1/authorize?client_id=${client-id}&response_type=code&scope=openid&redirect_uri=${redirect-uri}&state=${state}&code_challenge_method=S256&code_challenge=
```
* `Authorization Url`: The URL made available upon creating a user app. See [Getting Started](/v3/api-reference/authentication-v3/user-apps/getting-started-with-userapps) for more details.
* `client-id`: A unique ID that represents the user app. See [Getting Started](/v3/api-reference/authentication-v3/user-apps/getting-started-with-userapps) for more details.
* `redirect-uri`: The URI that fabric Identity redirects to after successful authentication. This should be a URI of the requesting user app and should contain a temporary authorization code (see step 5). The app should use the query parameters on the `redirect-uri` to complete the authentication flow with fabric Identity.
* `state`: An opaque value (can be a random string) the app uses to maintain state between the request and callback from fabric Identity. This parameter is typically used for preventing cross-site request forgery. [Click here](https://datatracker.ietf.org/doc/html/rfc6749#section-4.1.1) for more information.
* `code_challenge`: An SHA256 hash of the `code-verifier`. [Click here](https://datatracker.ietf.org/doc/html/rfc7636#section-4.2) for more details.
**3. fabric Identity sends 302 redirect to authentication prompt**
As a response to step 2, fabric Identity sends a redirect to the client browser to bring up the hosted login page. This hosted login page can also be configured for social logins, sign-up, and forgot-password links.
**4. Enter credentials and provide consent**
End users provide their credentials for authentication. If requested to do so, they will also indicate consent to have fabric Identity share their basic profile information with the calling app.
**5. Authorization code response returned to the specified redirect URI**
After a successful login, fabric Identity redirects the end user to the `redirect-uri` defined in step 2. As part of this redirect, fabric Identity sends the following additional details as query parameters:
* `code`: A temporary authorization code which will be returned to fabric Identity along with `code-verifier` to get an access token.
* `state`: The same `state` sent by the app to fabric Identity in step 2.
**6. Send authorization code with `code-verifier`**
Once the app receives the redirect from fabric Identity, it validates that the `state` field matches the one sent in step 2. After validation, the app fetches an access token by using the `code` to make a POST request to fabric Identity.
Example of the POST request (represented as a curl command):
```bash theme={null}
curl --request POST \
--url https://${Authorization Url}/v1/token \
-H 'accept: application/json' \
-H 'content-type: application/x-www-form-urlencoded' \
-d 'grant_type=authorization_code'
-d 'client_id=${client-id}'
-d 'redirect_uri=${redirect-uri}'
-d 'code=${code}'
-d 'code_verifier=${code-verifier}'
```
* `Authorization Url`: The URL made available upon creating a user app. See [Getting Started](/v3/api-reference/authentication-v3/user-apps/getting-started-with-userapps) for more details.
* `client-id`: A unique ID that represents the user app. See [Getting Started](/v3/api-reference/authentication-v3/user-apps/getting-started-with-userapps) for more details.
* `redirect-uri`: The same URI that the app originally sent to fabric Identity in step 2.
* `code`: The authorization code received by the app in step 5.
* `code-verifier`: The original `code-verifier` generated by the app in step 1.
**7. Validate `code-verifier`**
Once the POST request is received by the `/token` endpoint, fabric Identity validates the `code-verifier` by computing its SHA256 value, and verifying that against the `code-challenge` the app sent in step 2. If successfully validated, the endpoint returns the response, which includes the access token (next step).
**8. Respond with access token**
Upon successful `code-verifier` validation, fabric Identity returns the response with the access token:
```json theme={null}
{
"access_token": "eyJhbGciOiJ...",
"expires_in": 3600,
"id_token": "eyJhbGciOiJI...",
"refresh_token": "cBMrwDsXRwPqVmCQx7I5IX0jQ9-Lc_zHOgYeab1xZm4"
"scope": "openid offline_access",
"token_type": "Bearer"
}
```
The `access_token` returned in the response above is a [user token](/v3/api-reference/authentication-v3/concepts#access-token) that has a default expiration of 30 minutes (3600 seconds). This token is used by the app as a [bearer token](https://datatracker.ietf.org/doc/html/rfc6750) to access fabric APIs.
The response also contains a `refresh_token`, which the app can use to fetch a new `access_token` when previous one expires.
**9. Request fabric platform API access using access token as bearer token**
The app can now invoke any fabric API using the `access_token` received in the previous step. This token is sent in the `Authorization` header as a `Bearer` token, which is then validated by the fabric API.
App developers can use third-party libraries to achieve the authentication flows described above.
### Using Authorization Code Flow
fabric recommends using authorization code flow only when lacking browser support for PKCE. Also, as this flow needs the user app to pass the `client-secret`, it's essential that the app implements a backend for frontend (BFF) layer to exchange tokens with fabric Identity.
Ensure the following parameters are available before getting started with this authentication flow (for more information, see the [Getting Started](/v3/api-reference/authentication-v3/user-apps/getting-started-with-user-apps) guide):
`client-id` - A unique ID that represents the user app, and is required for OpenID Connect authentication flows.
`client-secret` - An app-specific secret that allows fabric Identity to validate the user app.
`Authorization Url` - The fabric Identity HTTP endpoint that the user app communicates with to get its access token.
Once these are available, you can build the authentication flow as depicted below:
**1. Generate PKCE `code-verifier` and `code-challenge`**
In this step, the single page app or mobile app, represented by the respective user app in fabric Identity, generates a `code-verifier`, which you will use to generate the `code-challenge`. These codes ensure that the access token returned by fabric Identity (step 8) is returned to the correct requestor.
`code-verifier`: Random URL-safe string of at least 43 characters. [Click here](https://datatracker.ietf.org/doc/html/rfc7636#section-4.1) for more details.
`code-challenge`: Base64 URL-encoded SHA-256 hash of the `code-verifier`.
The app should store the `code-verifier` securely to be used later (step 6). The `code-challenge` is sent earlier in the call to the `/authorize` endpoint (step 2).
**2. Authorization code request with `code-challenge` to `/authorize`**
In this step, the app should send a GET request to fabric Identity's `/authorize` endpoint and load the GET URL into the `window.location`. This allows fabric Identity to send a browser redirect, and take the end user to the hosted login page.
This is a representation of the URL that should be constructed and loaded into `window.location`:
```
https://${Authorization Url}/v1/authorize?client_id=${client-id}&response_type=code&scope=openid&redirect_uri=${redirect-uri}&state=${state}&code_challenge_method=S256&code_challenge=
```
* `Authorization Url`: The URL made available upon creating a user app. See [Getting Started](/v3/api-reference/authentication-v3/user-apps/getting-started-with-userapps) for more details.
* `client-id`: A unique ID that represents the user app. See [Getting Started](/v3/api-reference/authentication-v3/user-apps/getting-started-with-userapps) for more details.
* `redirect-uri`: The URI that fabric Identity redirects to after successful authentication. This should be a URI of the requesting user app and should contain a temporary authorization code (see step 5). The app should use the query parameters on the `redirect-uri` to complete the authentication flow with fabric Identity.
* `state`: An opaque value (can be a random string) the app uses to maintain state between the request and callback from fabric Identity. This parameter is typically used for preventing cross-site request forgery. [Click here](https://datatracker.ietf.org/doc/html/rfc6749#section-4.1.1) for more information.
* `code_challenge`: An SHA256 hash of the `code-verifier`. [Click here](https://datatracker.ietf.org/doc/html/rfc7636#section-4.2) for more details.
**3. fabric Identity sends 302 redirect to authentication prompt**
As a response to step 2, fabric Identity sends a redirect to the client browser to bring up the hosted login page. This hosted login page can also be configured for social logins, sign-up, and forgot-password links.
**4. Enter credentials and provide consent**
End users provide their credentials for authentication. If requested to do so, they will also indicate consent to have fabric Identity share their basic profile information with the calling app.
**5. Authorization code response returned to the specified redirect URI**
After a successful login, fabric Identity redirects the end user to the `redirect-uri` defined in step 2. As part of this redirect, fabric Identity sends the following additional details as query parameters:
* `code`: A temporary authorization code which will be returned to fabric Identity along with `code-verifier` to get an access token.
* `state`: The same `state` sent by the app to fabric Identity in step 2.
**6. Send authorization code with `code-verifier`**
Once the app receives the redirect from fabric Identity, it validates that the `state` field matches the one sent in step 2. After validation, the app fetches an access token by using the `code` to make a POST request to fabric Identity.
Example of the POST request (represented as a curl command):
```bash theme={null}
curl --request POST \
--url https://${Authorization Url}/v1/token \
-H 'accept: application/json' \
-H 'content-type: application/x-www-form-urlencoded' \
-d 'grant_type=authorization_code'
-d 'client_id=${client-id}'
-d 'redirect_uri=${redirect-uri}'
-d 'code=${code}'
-d 'code_verifier=${code-verifier}'
```
* `Authorization Url`: The URL made available upon creating a user app. See [Getting Started](/v3/api-reference/authentication-v3/user-apps/getting-started-with-userapps) for more details.
* `client-id`: A unique ID that represents the user app. See [Getting Started](/v3/api-reference/authentication-v3/user-apps/getting-started-with-userapps) for more details.
* `redirect-uri`: The same URI that the app originally sent to fabric Identity in step 2.
* `code`: The authorization code received by the app in step 5.
* `code-verifier`: The original `code-verifier` generated by the app in step 1.
**7. Validate `code-verifier`**
Once the POST request is received by the `/token` endpoint, fabric Identity validates the `code-verifier` by computing its SHA256 value, and verifying that against the `code-challenge` the app sent in step 2. If successfully validated, the endpoint returns the response, which includes the access token (next step).
**8. Respond with access token**
Upon successful `code-verifier` validation, fabric Identity returns the response with the access token:
```json theme={null}
{
"access_token": "eyJhbGciOiJ...",
"expires_in": 3600,
"id_token": "eyJhbGciOiJI...",
"refresh_token": "cBMrwDsXRwPqVmCQx7I5IX0jQ9-Lc_zHOgYeab1xZm4"
"scope": "openid offline_access",
"token_type": "Bearer"
}
```
The `access_token` returned in the response above is a [user token](/v3/api-reference/authentication-v3/concepts#access-token) that has a default expiration of 30 minutes (3600 seconds). This token is used by the app as a [bearer token](https://datatracker.ietf.org/doc/html/rfc6750) to access fabric APIs.
The response also contains a `refresh_token`, which the app can use to fetch a new `access_token` when previous one expires.
**9. Request fabric platform API access using access token as bearer token**
The app can now invoke any fabric API using the `access_token` received in the previous step. This token is sent in the `Authorization` header as a `Bearer` token, which is then validated by the fabric API.
App developers can use third-party libraries to achieve the authentication flows described above.
### Using Authorization Code Flow
fabric recommends using authorization code flow only when lacking browser support for PKCE. Also, as this flow needs the user app to pass the `client-secret`, it's essential that the app implements a backend for frontend (BFF) layer to exchange tokens with fabric Identity.
Ensure the following parameters are available before getting started with this authentication flow (for more information, see the [Getting Started](/v3/api-reference/authentication-v3/user-apps/getting-started-with-user-apps) guide):
`client-id` - A unique ID that represents the user app, and is required for OpenID Connect authentication flows.
`client-secret` - An app-specific secret that allows fabric Identity to validate the user app.
`Authorization Url` - The fabric Identity HTTP endpoint that the user app communicates with to get its access token.
Once these are available, you can build the authentication flow as depicted below:
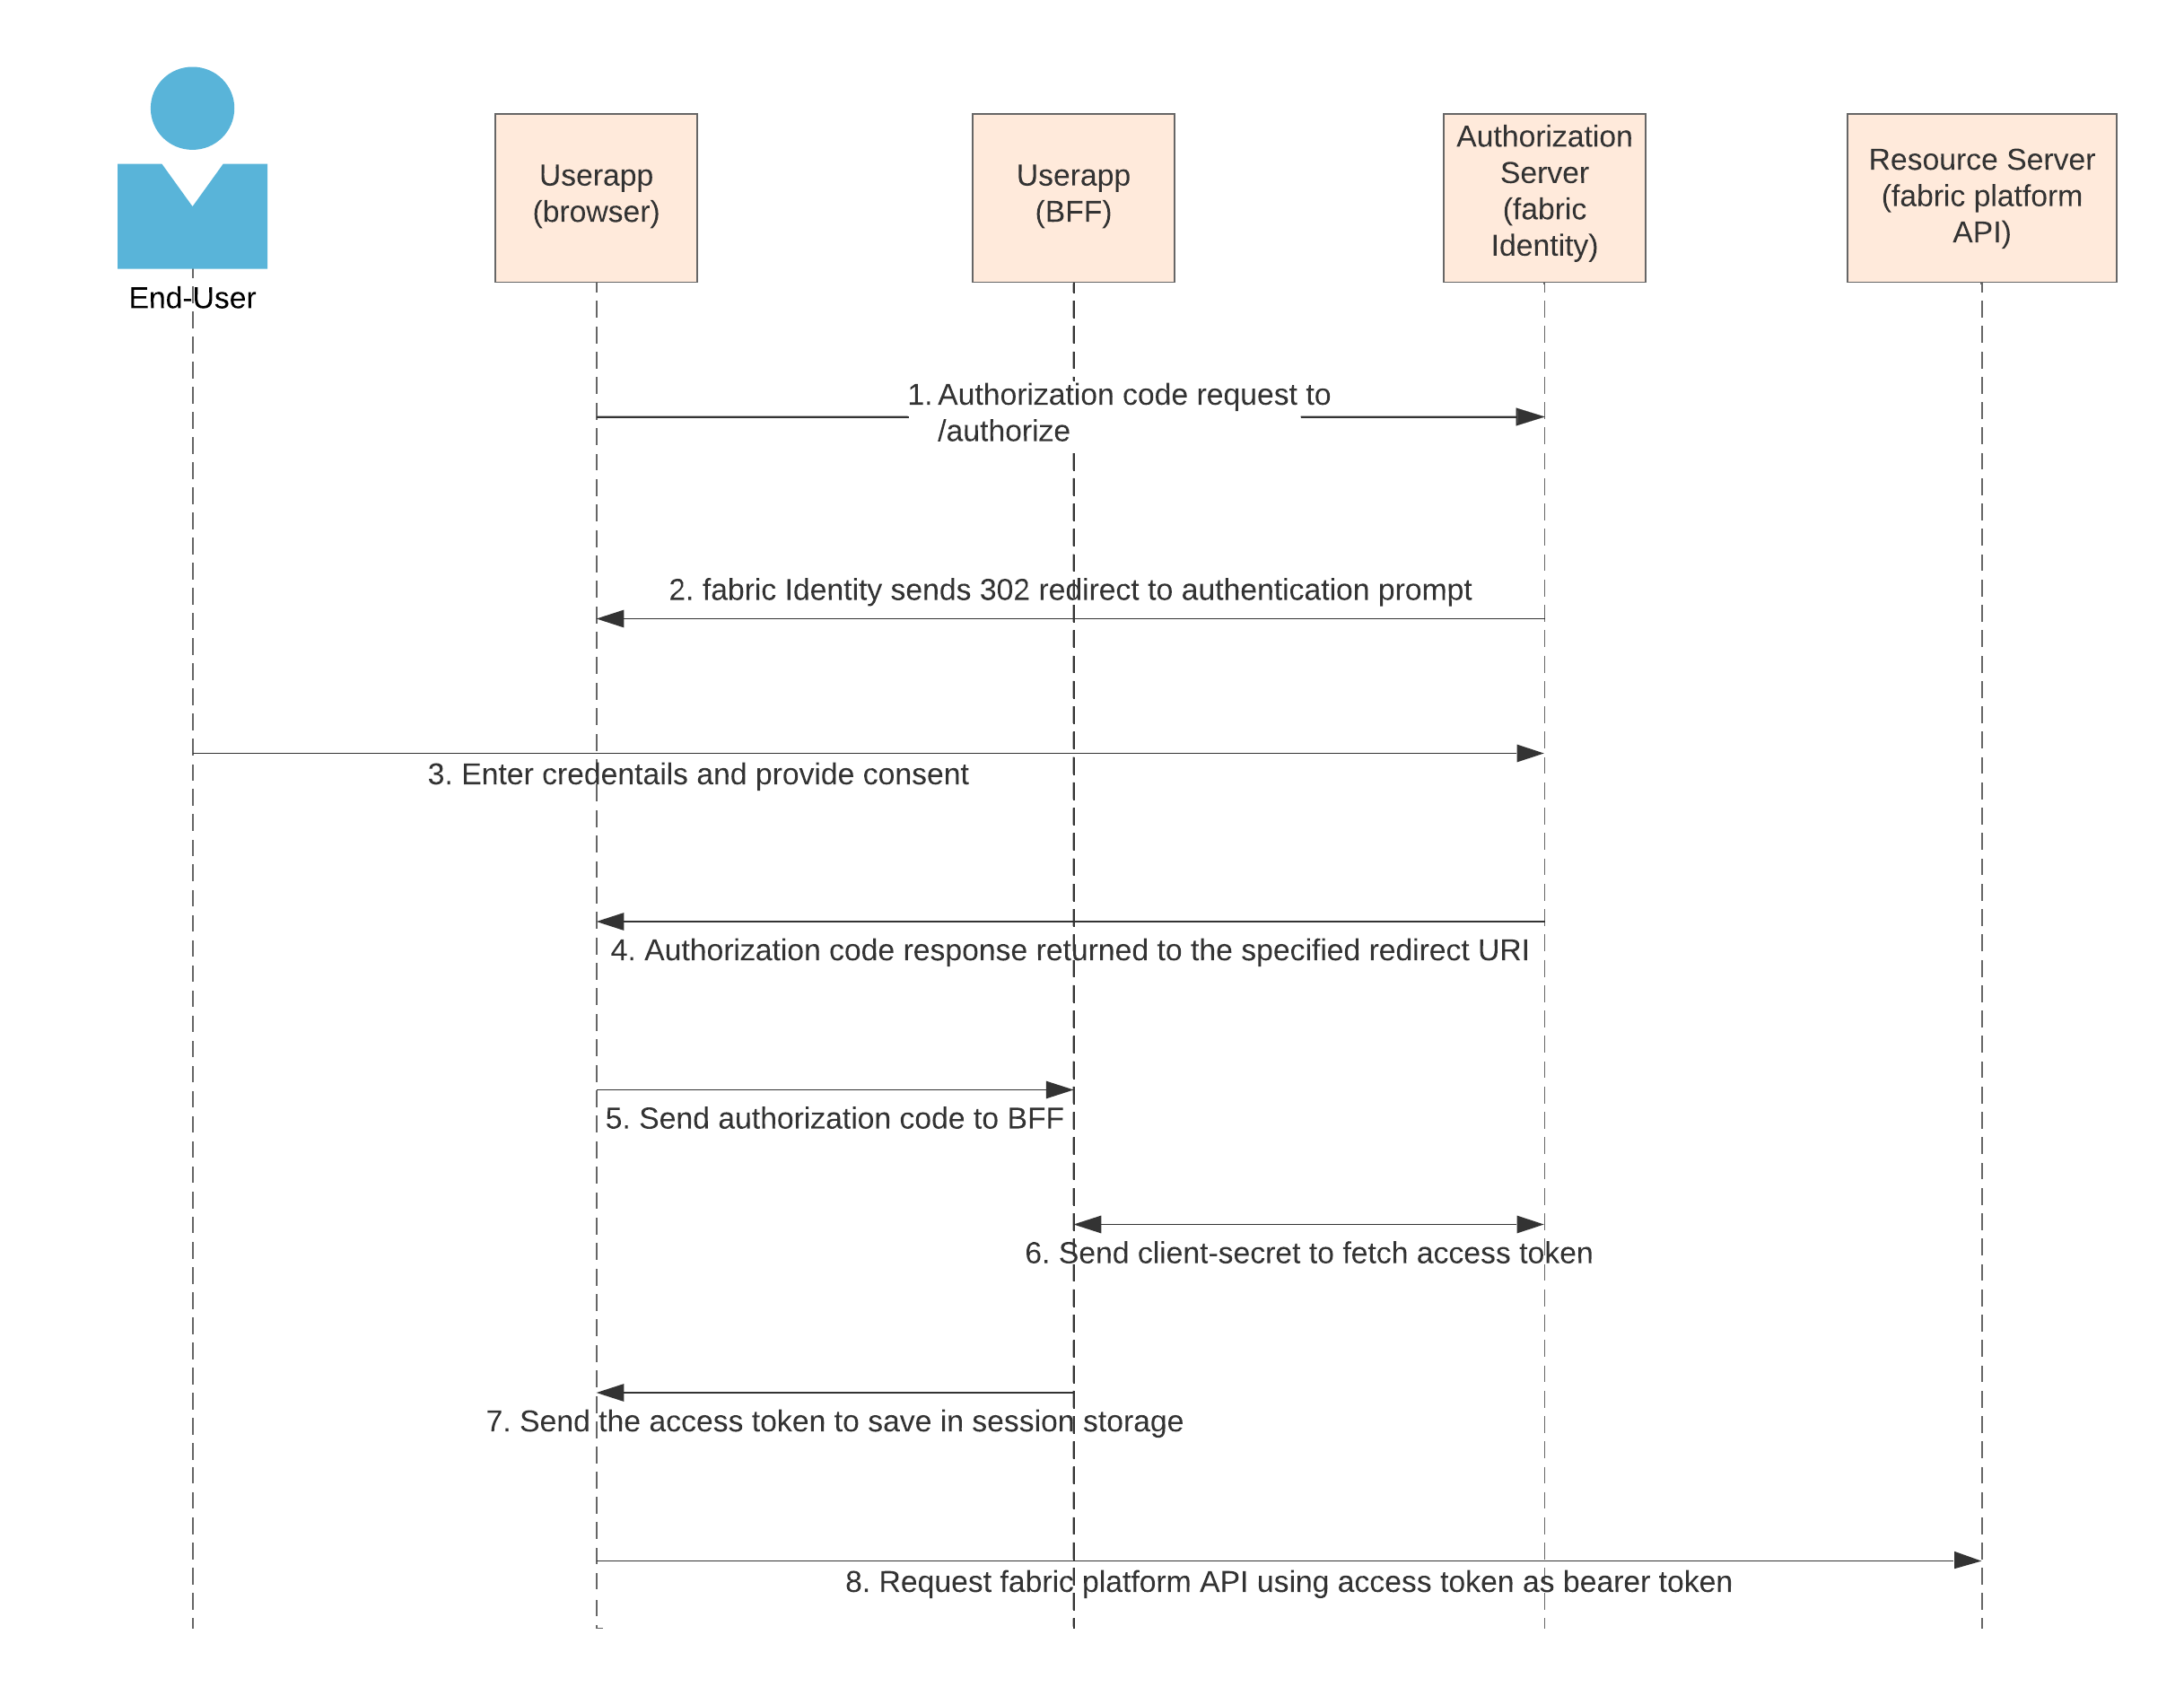 **1. Authorization code request to /authorize**
In this step, the app should send a GET request to fabric Identity's `/authorize` endpoint and load the GET URL into the `window.location`. This allows fabric Identity to send a browser redirect, and take the end user to the hosted login page.
This is a representation of the URL that should be constructed and loaded into `window.location`:
```
https://${Authorization Url}/oauth2/default/v1/authorize?client_id=${client-id}&response_type=code&scope=openid&redirect_uri=${redirect-uri}&state=${state}
```
* `Authorization Url`: The URL made available upon creating a user app. See [Getting Started](/v3/api-reference/authentication-v3/user-apps/getting-started-with-userapps) for more details.
* `client-id`: A unique ID that represents the user app. See [Getting Started](/v3/api-reference/authentication-v3/user-apps/getting-started-with-userapps) for more details.
* `redirect-uri`: The URI that fabric Identity redirects to after successful authentication. This should be a URI of the requesting user app and should contain a temporary authorization code (see step 4). The app should use the query parameters on the `redirect-uri` to complete the authentication flow with fabric Identity.
* `state`: An opaque value (can be a random string) the app uses to maintain state between the request and callback from fabric Identity. This parameter is typically used for preventing cross-site request forgery. [Click here](https://datatracker.ietf.org/doc/html/rfc6749#section-4.1.1) for more information.
* `code_challenge`: An SHA256 hash of the `code-verifier`. [Click here](https://datatracker.ietf.org/doc/html/rfc7636#section-4.2) for more details.
**2. fabric Identity sends 302 redirect to authentication prompt**
As a response to step 1, fabric Identity sends a redirect to the client browser to bring up the hosted login page. This hosted login page can also be configured for social logins, sign-up, and forgot-password links.
**3. Enter credentials and provide consent**
End users provide their credentials for authentication. If requested to do so, they will also indicate consent to have fabric Identity share their basic profile information with the calling app.
**4. Authorization code response returned to the specified redirect URI**
After a successful login, fabric Identity redirects the end user to the `redirect-uri` defined in step 1. As part of this redirect, fabric Identity sends the following additional details as query parameters:
* `code`: A temporary authorization code which will be returned to fabric Identity. This code would be used in step 5 and 6 to finally fetch the access token.
* `state`: The same `state` sent by the app to fabric Identity in step 1.
**5. Send authorization code to BFF**
The browser component of the user app sends the `code` (received in step 4) to the BFF (backend for frontend) component of the app. This is done so that browser loading JS files can avoid having the `client-secret` visible to the end user. This is a custom implementation done by the developer, as it's a call between the browser and the BFF layer of their user app.
**6. Send `client-secret` to fetch access token**
The BFF layer of the user app sends the `code` (received in step 5) along with the `client-secret` to authorization server. Upon validating the `client-secret`, the authorization server sends the access token in the response of this call.
Following is an example of the POST request that's made by the BFF layer to the authorization server:
```bash theme={null}
curl --request POST \
--url https://${Authorization Url}/v1/token \
-H 'accept: application/json' \
-H 'content-type: application/x-www-form-urlencoded' \
-H 'Authorization:
-d 'grant_type=authorization_code'
-d 'redirect_uri=${redirect-uri}'
-d 'code=${code}'
```
* `Authorization Url`: The URL made available upon creating a user app. See [Getting Started](/v3/api-reference/authentication-v3/user-apps/getting-started-with-user-apps) for more details.
* `client-id`: A unique ID that represents the user app. See [Getting Started](/v3/api-reference/authentication-v3/user-apps/getting-started-with-user-apps) for more details.
* `client-secret` - An app-specific secret that allows fabric Identity to validate the user app.
* `redirect-uri`: The same URI that the app originally sent to fabric Identity in step 2.
* `code`: The authorization code received by the app in step 5.
Upon successful validation of `client-secret`, fabric Identity returns the response that includes the access token:
```json theme={null}
{
"access_token": "eyJhbGciOiJ...",
"expires_in": 3600,
"id_token": "eyJhbGciOiJI...",
"refresh_token": "cBMrwDsXRwPqVmCQx7I5IX0jQ9-Lc_zHOgYeab1xZm4"
"scope": "openid offline_access",
"token_type": "Bearer"
}
```
The `access_token` returned in the response above is a [user token](/v3/api-reference/authentication-v3/concepts#access-token) that has a default expiration of 30 minutes (3600 seconds). This token is used by the app as a [bearer token](https://datatracker.ietf.org/doc/html/rfc6750) to access fabric APIs.
The response also contains a `refresh_token`, which the app can use to fetch a new `access_token` when previous one expires.
**7. Send the access token to save in session storage**
This is a custom implementation done by the developer ensuring that the access token is saved on the end user's session store within the browser so that it can be used by the user app in all subsequent calls to fabric APIs.
**8. Request fabric platform API using access token as bearer token**
The app can now invoke any fabric API using the `access_token` received in the previous step. This token is sent in the `Authorization` header as a `Bearer` token, which is then validated by the fabric API.
### Refresh Access Token
User tokens generated by fabric Identity have a default expiration of 30 minutes. Refresh tokens, on the other hand are longer-living tokens and can be used to retrieve new access tokens without asking the end user to login again. For security reasons, every time a refresh token is used to get a new access token, the previous refresh token is discarded and a new one is created. Refresh tokens are also discarded if not used for seven days. If a refresh token expires, the app can follow the previous authentication flow and have the end user login again.
Sample call to get a new access token from a refresh token:
```bash theme={null}
curl --location --request POST 'https://${Authorization Url}/v1/token' \
--header 'Content-Type: application/x-www-form-urlencoded' \
--data-urlencode 'grant_type=refresh_token' \
--data-urlencode 'redirect_uri=${redirect-uri}' \
--data-urlencode 'scope=offline_access openid' \
--data-urlencode 'refresh_token=${refresh-token}' \
--data-urlencode 'client_id=${client-id}'
```
* `Authorization Url`: The URL made available upon creating a user app. See [Getting Started](/v3/api-reference/authentication-v3/user-apps/getting-started-with-user-apps) for more details.
* `client-id`: A unique ID that represents the user app. See [Getting Started](/v3/api-reference/authentication-v3/user-apps/getting-started-with-user-apps) for more details.
* `redirect-uri`: The same URI that the app originally sent to fabric Identity in step 2.
* `refresh-token`: Refresh token received by the app along with the access token.
Sample response sent from fabric Identity for the refresh request:
```json theme={null}
{
"token_type": "Bearer",
"expires_in": 3600,
"access_token": "eyJraWQiO...",
"scope": "offline_access openid",
"refresh_token": "jSdVOtddMk8HMHP...",
"id_token": "eyJraWQ..."
}
```
The response contains both a new `access_token` and a new `refresh_token`.
**1. Authorization code request to /authorize**
In this step, the app should send a GET request to fabric Identity's `/authorize` endpoint and load the GET URL into the `window.location`. This allows fabric Identity to send a browser redirect, and take the end user to the hosted login page.
This is a representation of the URL that should be constructed and loaded into `window.location`:
```
https://${Authorization Url}/oauth2/default/v1/authorize?client_id=${client-id}&response_type=code&scope=openid&redirect_uri=${redirect-uri}&state=${state}
```
* `Authorization Url`: The URL made available upon creating a user app. See [Getting Started](/v3/api-reference/authentication-v3/user-apps/getting-started-with-userapps) for more details.
* `client-id`: A unique ID that represents the user app. See [Getting Started](/v3/api-reference/authentication-v3/user-apps/getting-started-with-userapps) for more details.
* `redirect-uri`: The URI that fabric Identity redirects to after successful authentication. This should be a URI of the requesting user app and should contain a temporary authorization code (see step 4). The app should use the query parameters on the `redirect-uri` to complete the authentication flow with fabric Identity.
* `state`: An opaque value (can be a random string) the app uses to maintain state between the request and callback from fabric Identity. This parameter is typically used for preventing cross-site request forgery. [Click here](https://datatracker.ietf.org/doc/html/rfc6749#section-4.1.1) for more information.
* `code_challenge`: An SHA256 hash of the `code-verifier`. [Click here](https://datatracker.ietf.org/doc/html/rfc7636#section-4.2) for more details.
**2. fabric Identity sends 302 redirect to authentication prompt**
As a response to step 1, fabric Identity sends a redirect to the client browser to bring up the hosted login page. This hosted login page can also be configured for social logins, sign-up, and forgot-password links.
**3. Enter credentials and provide consent**
End users provide their credentials for authentication. If requested to do so, they will also indicate consent to have fabric Identity share their basic profile information with the calling app.
**4. Authorization code response returned to the specified redirect URI**
After a successful login, fabric Identity redirects the end user to the `redirect-uri` defined in step 1. As part of this redirect, fabric Identity sends the following additional details as query parameters:
* `code`: A temporary authorization code which will be returned to fabric Identity. This code would be used in step 5 and 6 to finally fetch the access token.
* `state`: The same `state` sent by the app to fabric Identity in step 1.
**5. Send authorization code to BFF**
The browser component of the user app sends the `code` (received in step 4) to the BFF (backend for frontend) component of the app. This is done so that browser loading JS files can avoid having the `client-secret` visible to the end user. This is a custom implementation done by the developer, as it's a call between the browser and the BFF layer of their user app.
**6. Send `client-secret` to fetch access token**
The BFF layer of the user app sends the `code` (received in step 5) along with the `client-secret` to authorization server. Upon validating the `client-secret`, the authorization server sends the access token in the response of this call.
Following is an example of the POST request that's made by the BFF layer to the authorization server:
```bash theme={null}
curl --request POST \
--url https://${Authorization Url}/v1/token \
-H 'accept: application/json' \
-H 'content-type: application/x-www-form-urlencoded' \
-H 'Authorization:
-d 'grant_type=authorization_code'
-d 'redirect_uri=${redirect-uri}'
-d 'code=${code}'
```
* `Authorization Url`: The URL made available upon creating a user app. See [Getting Started](/v3/api-reference/authentication-v3/user-apps/getting-started-with-user-apps) for more details.
* `client-id`: A unique ID that represents the user app. See [Getting Started](/v3/api-reference/authentication-v3/user-apps/getting-started-with-user-apps) for more details.
* `client-secret` - An app-specific secret that allows fabric Identity to validate the user app.
* `redirect-uri`: The same URI that the app originally sent to fabric Identity in step 2.
* `code`: The authorization code received by the app in step 5.
Upon successful validation of `client-secret`, fabric Identity returns the response that includes the access token:
```json theme={null}
{
"access_token": "eyJhbGciOiJ...",
"expires_in": 3600,
"id_token": "eyJhbGciOiJI...",
"refresh_token": "cBMrwDsXRwPqVmCQx7I5IX0jQ9-Lc_zHOgYeab1xZm4"
"scope": "openid offline_access",
"token_type": "Bearer"
}
```
The `access_token` returned in the response above is a [user token](/v3/api-reference/authentication-v3/concepts#access-token) that has a default expiration of 30 minutes (3600 seconds). This token is used by the app as a [bearer token](https://datatracker.ietf.org/doc/html/rfc6750) to access fabric APIs.
The response also contains a `refresh_token`, which the app can use to fetch a new `access_token` when previous one expires.
**7. Send the access token to save in session storage**
This is a custom implementation done by the developer ensuring that the access token is saved on the end user's session store within the browser so that it can be used by the user app in all subsequent calls to fabric APIs.
**8. Request fabric platform API using access token as bearer token**
The app can now invoke any fabric API using the `access_token` received in the previous step. This token is sent in the `Authorization` header as a `Bearer` token, which is then validated by the fabric API.
### Refresh Access Token
User tokens generated by fabric Identity have a default expiration of 30 minutes. Refresh tokens, on the other hand are longer-living tokens and can be used to retrieve new access tokens without asking the end user to login again. For security reasons, every time a refresh token is used to get a new access token, the previous refresh token is discarded and a new one is created. Refresh tokens are also discarded if not used for seven days. If a refresh token expires, the app can follow the previous authentication flow and have the end user login again.
Sample call to get a new access token from a refresh token:
```bash theme={null}
curl --location --request POST 'https://${Authorization Url}/v1/token' \
--header 'Content-Type: application/x-www-form-urlencoded' \
--data-urlencode 'grant_type=refresh_token' \
--data-urlencode 'redirect_uri=${redirect-uri}' \
--data-urlencode 'scope=offline_access openid' \
--data-urlencode 'refresh_token=${refresh-token}' \
--data-urlencode 'client_id=${client-id}'
```
* `Authorization Url`: The URL made available upon creating a user app. See [Getting Started](/v3/api-reference/authentication-v3/user-apps/getting-started-with-user-apps) for more details.
* `client-id`: A unique ID that represents the user app. See [Getting Started](/v3/api-reference/authentication-v3/user-apps/getting-started-with-user-apps) for more details.
* `redirect-uri`: The same URI that the app originally sent to fabric Identity in step 2.
* `refresh-token`: Refresh token received by the app along with the access token.
Sample response sent from fabric Identity for the refresh request:
```json theme={null}
{
"token_type": "Bearer",
"expires_in": 3600,
"access_token": "eyJraWQiO...",
"scope": "offline_access openid",
"refresh_token": "jSdVOtddMk8HMHP...",
"id_token": "eyJraWQ..."
}
```
The response contains both a new `access_token` and a new `refresh_token`.